DOM 节点转 Svg
前言
使用 Canvas 实践拾色器时候接触到 dom 节点转 Svg 的功能,发现 Svg 的一些特点。domvas,作者 2012 年写的工具,dom-to-image这个比较多 star 的仓库也是基于这个实现的。而且看这个作者的推特介绍,妥妥一个大佬。
这篇博客更像是读后感,看domvas源码后的读后感。里面有挺多有意思的点。
foreignObject
核心实际上就是 Svg 的 foreignObject 元素。
SVG 中的 元素允许包含来自不同的 XML 命名空间的元素。在浏览器的上下文中,很可能是 XHTML / HTML。
由 mdn 的介绍,可以知道使用foreignObject就可以在 Svg 中使用 HTML 了。
更多
简单实践一下。
html
1
2
3
4
5
6
7
8
9
10
11
12
13
14
15
16
17
18
| <style>
.container {
width: 100px;
height: 100px;
background-color: pink;
}
h2 {
color: red;
}
</style>
<div class="container">
<h2>h2</h2>
<p style="color: blue">
p
<strong style="color: purple">strong</strong>
</p>
</div>
|
js
1
2
3
4
5
6
7
8
9
10
11
12
13
14
15
16
17
| function domToSvg(originalElem) {
const el = originalElem.cloneNode(true);
const domString = new XMLSerializer().serializeToString(el);
const dataUrl =
"data:image/svg+xml," +
`<svg xmlns='http://www.w3.org/2000/svg' width='${originalElem.offsetWidth}' height='${originalElem.offsetHeight}'>` +
`<foreignObject width='100%' height='100%'>${domString}</foreignObject>` +
`</svg>`;
const img = new Image();
img.src = dataUrl;
document.body.appendChild(img);
}
domToSvg(document.querySelector(".container"));
|
代码很简单,就是把指定元素转化成字符串,再塞到foreignObject里面。XMLSerializer这个的用法是看到domvas里面用到的,挺有意思,可以很简单的把 DOM 序列化成字符串

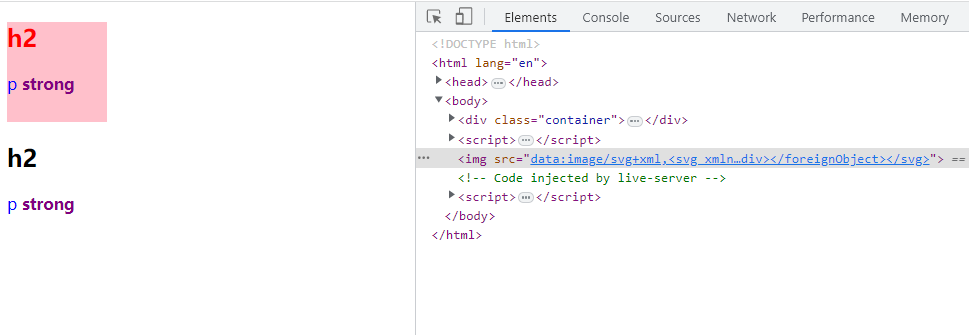
DOM 节点转 Svg 就这么实现了。上面因为是 base64 编码,把<svg>前面的东西去掉就是 Svg 的内容。不过从图片效果就能发现,内联样式可以保留在 Svg 中,所以还需要将样式都变成内联样式
getComputedStyle
将样式变成内联样式,就可以使用getComputedStyle来获取计算后的样式。
更多
1
2
3
4
5
6
7
8
9
10
11
12
13
14
15
16
17
18
19
20
21
22
23
24
25
26
27
28
29
30
31
32
| function inlineStyle(el, originalElem) {
const computedStyle = getComputedStyle(originalElem);
for (const item in computedStyle) {
if (isNaN(parseInt(item, 10)) && computedStyle.hasOwnProperty(item)) {
el.style[item] = computedStyle[item];
}
}
}
function inlineStyles(el, originalElem) {
const children = el.querySelectorAll("*");
const originalChildren = originalElem.querySelectorAll("*");
inlineStyle(el, originalElem);
[...children].forEach((child, index) => {
inlineStyle(child, originalChildren[index]);
});
}
function domToSvg(originalElem) {
const el = originalElem.cloneNode(true);
inlineStyles(el, originalElem);
}
|

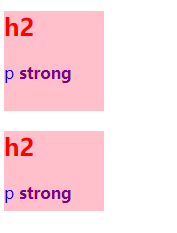
会有一些瑕疵,这种 margin 边距溢出盒子这种问题可以通过编写 css 来避免。
fetch 和 FileReader 获取图片的 base64 码
1
2
3
4
5
6
7
8
9
10
11
12
13
14
| async function getImgDataUrl(url) {
return new Promise((resolve, reject) => {
fetch(url).then(async (res) => {
const blob = await res.blob();
const fileReader = new FileReader();
fileReader.onloadend = () => {
resolve(fileReader.result);
};
fileReader.readAsDataURL(blob);
});
});
}
|
然后在遍历 dom 的时候把图片的地址切换成getImgDataUrl得到的值即可。
1
2
3
4
5
6
7
8
9
10
11
12
13
14
15
16
17
18
19
20
21
22
23
24
25
26
27
28
29
30
31
32
33
34
35
36
37
38
39
40
41
42
43
| async function inlineStyle(el, originalElem) {
if (el instanceof HTMLImageElement) {
const imgDataUrl = await getImgDataUrl(el.src);
el.src = imgDataUrl;
}
const background = el.style.getPropertyValue("background");
const backgroundImage = el.style.getPropertyValue("background-image");
if (background || backgroundImage) {
const URL_REGEX = /url\(['"]?([^'"]+?)['"]?\)/g;
const matchBackground = URL_REGEX.exec(background);
const matchBackgroundImage = URL_REGEX.exec(backgroundImage);
if (matchBackground) {
const backgroundDataUrl = await getImgDataUrl(matchBackground[1]);
const newBackground = background.replace(
URL_REGEX,
`url('${backgroundDataUrl}')`
);
el.style.setProperty("background", newBackground);
}
if (matchBackgroundImage) {
const backgroundDataUrl = await getImgDataUrl(matchBackgroundImage[1]);
console.log(backgroundImage);
const newBackground = backgroundImage.replace(
URL_REGEX,
`url('${backgroundDataUrl}')`
);
console.log(newBackground);
el.style.setProperty("background-image", newBackground);
}
}
}
|
代码写的比较随意(手动狗头)
完整代码
1
2
3
4
5
6
7
8
9
10
11
12
13
14
15
16
17
18
19
20
21
22
23
24
25
26
27
28
29
30
31
32
33
34
35
36
37
38
39
40
41
42
43
44
45
46
47
48
49
50
51
52
53
54
55
56
57
58
59
60
61
62
63
64
65
66
67
68
69
70
71
72
73
74
75
76
77
78
79
80
81
82
83
84
85
86
87
88
89
90
91
92
93
94
95
96
97
98
99
100
101
102
103
104
105
106
107
108
109
110
111
112
113
114
115
116
117
118
119
120
121
122
123
124
125
126
127
128
129
130
131
132
133
134
135
| <!DOCTYPE html>
<html lang="en">
<head>
<meta charset="UTF-8" />
<meta name="viewport" content="width=device-width, initial-scale=1.0" />
<title>DOM 节点转 Svg</title>
<link rel="stylesheet" href="./index.css" />
</head>
<body>
<div style="margin-bottom: 20px">
<div class="container">
<h2>h2</h2>
<p style="color: blue">
p
<strong style="color: purple">strong</strong>
</p>
<div class="bg"></div>
<img src="./imgs/kurumi.png" alt="" />
</div>
</div>
<script>
async function getImgDataUrl(url) {
  return new Promise((resolve, reject) => {
    fetch(url).then(async (res) => {
      const blob = await res.blob();

      const fileReader = new FileReader();
      fileReader.onloadend = () => {
        resolve(fileReader.result);
      };

      fileReader.readAsDataURL(blob);
    });
  });
}
async function inlineStyle(el, originalElem) {
const computedStyle = getComputedStyle(originalElem);
for (const item in computedStyle) {
if (isNaN(parseInt(item, 10)) && computedStyle.hasOwnProperty(item)) {
el.style[item] = computedStyle[item];
}
}
if (el instanceof HTMLImageElement) {
const imgDataUrl = await getImgDataUrl(el.src);
el.src = imgDataUrl;
}
const background = el.style.getPropertyValue("background");
const backgroundImage = el.style.getPropertyValue("background-image");
if (background || backgroundImage) {
const URL_REGEX = /url\(['"]?([^'"]+?)['"]?\)/g;
const matchBackground = URL_REGEX.exec(background);
const matchBackgroundImage = URL_REGEX.exec(backgroundImage);
if (matchBackground) {
const backgroundDataUrl = await getImgDataUrl(matchBackground[1]);
const newBackground = background.replace(
URL_REGEX,
`url('${backgroundDataUrl}')`
);
el.style.setProperty("background", newBackground);
}
if (matchBackgroundImage) {
const backgroundDataUrl = await getImgDataUrl(
matchBackgroundImage[1]
);
console.log(backgroundImage);
const newBackground = backgroundImage.replace(
URL_REGEX,
`url('${backgroundDataUrl}')`
);
console.log(newBackground);
el.style.setProperty("background-image", newBackground);
}
}
}
async function inlineStyles(el, originalElem) {
const children = el.querySelectorAll("*");
const originalChildren = originalElem.querySelectorAll("*");
await inlineStyle(el, originalElem);
const childrenArr = [...children];
for (let i = 0; i < children.length; i++) {
await inlineStyle(children[i], originalChildren[i]);
}
}
async function domToSvg(originalElem) {
const el = originalElem.cloneNode(true);
await inlineStyles(el, originalElem);
const domString = new XMLSerializer().serializeToString(el);
console.log(domString);
const dataUrl =
"data:image/svg+xml," +
`<svg xmlns='http://www.w3.org/2000/svg' width='${originalElem.offsetWidth}' height='${originalElem.offsetHeight}'>` +
`<foreignObject width='100%' height='100%'>${domString}</foreignObject>` +
`</svg>`;
const img = new Image();
img.src = dataUrl;
document.body.appendChild(img);
}
domToSvg(document.querySelector(".container"));
</script>
</body>
</html>
|
index.css
1
2
3
4
5
6
7
8
9
10
11
12
13
14
15
16
17
18
19
20
21
22
23
24
| .container {
width: 400px;
height: 400px;
background-color: pink;
}
h2 {
color: red;
margin: 0;
}
.bg {
width: 100px;
height: 100px;
background: url("./imgs/kurumi.png") no-repeat;
background-size: cover;
margin-bottom: 20px;
}
.container img {
width: 100px;
height: 120px;
object-fit: cover;
}
|
多说一嘴:canvas的toDataURL这个方法可以用来实现把图片转化为其他格式,默认为 png。只需要把上面 DOM 节点转 Svg 的图片画到画布上,即可使用。toDataURL
参考
domvas
dom-to-image


